How to Stop Your Welds From Cracking
You just laid down what looks like a perfect bead. You let it cool, hit it with a hammer, and CRACK! Your hard work just failed. Sound familiar?
Weld cracks aren't just ugly; they're a serious structural failure. A cracked weld is a weak weld, and it means your project isn't going to hold up under stress. Don't let a hidden crack turn your custom fabrication or critical repair into scrap metal. Understanding why cracks happen is the first step to making them disappear.
Understand the Root Causes of Cracking
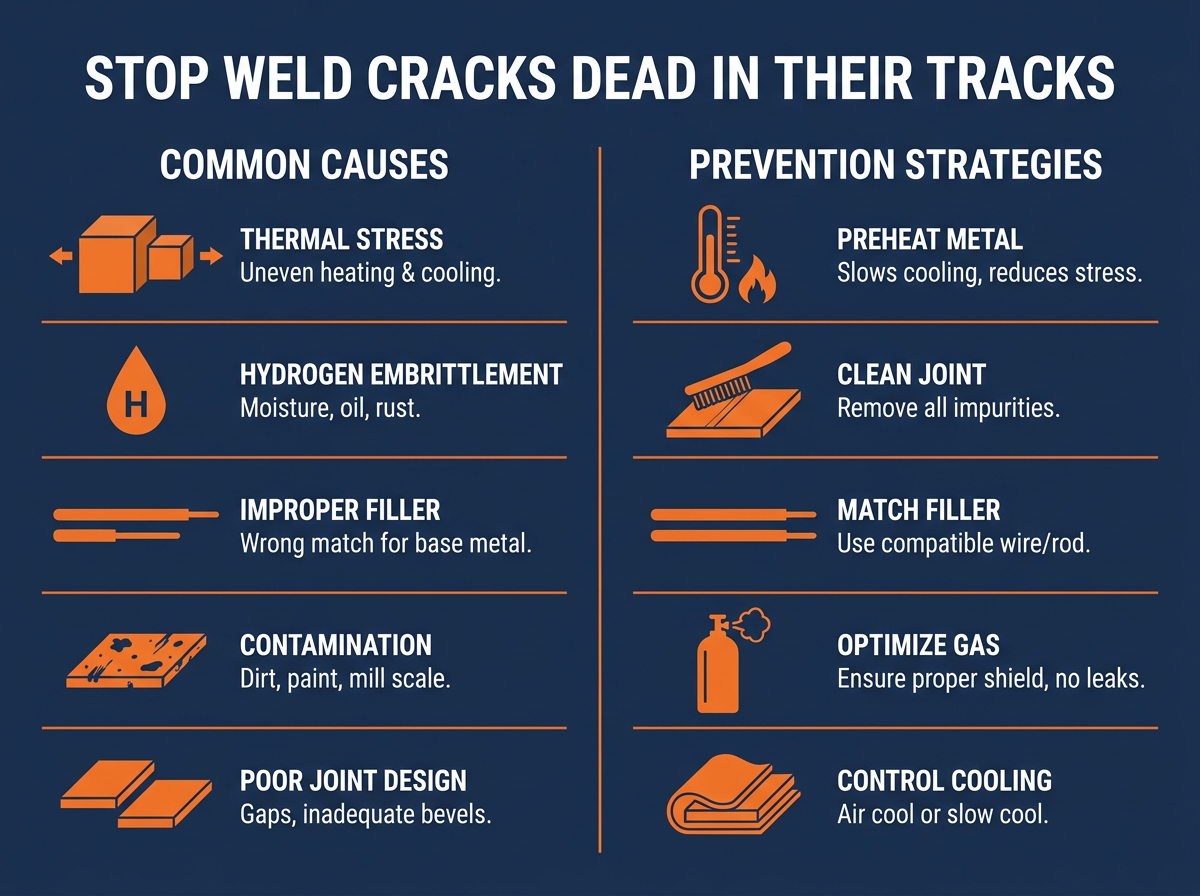
Cracks are a sign of stress exceeding the material's strength. This can happen during welding (hot cracks) or after cooling (cold cracks). The biggest culprits are thermal expansion and contraction, impurities, hydrogen, and improper joint design. Think of it like a tug-of-war inside the metal.
When you weld, you're superheating a small area, making it expand. As it cools, it contracts. If the surrounding metal or the weld itself can't handle those forces, something has to give. That "something" is often a crack. Impurities like sulfur or phosphorus can also create weak points, acting as crack initiation sites.
Preheat Your Metal Like a Pro
Preheating isn't just for fancy industrial jobs; it's crucial for beginners too, especially on thicker materials or alloy steels. When you preheat, you slow down the cooling rate of the weld and the surrounding base metal. This reduces the temperature difference, making the material less brittle and more ductile as it cools.
For common mild steels like A36, anything over 1/2-inch thick benefits from preheat. For tougher stuff like structural steel or cast iron, it's non-negotiable. Use a propane torch, rosebud tip, or even an oven for smaller parts. Check your temperature with a temp stick (like a Tempilstik 400°F) or an infrared thermometer. Aim for 200-400°F, depending on the material and thickness, but always check your specific material's recommendations.
Cleanliness is Next to Weld-liness
This isn't just about pretty welds; it's about strong, crack-free welds. Any contaminants like grease, oil, paint, rust, or even moisture introduce hydrogen and other impurities into your weld puddle. Hydrogen is a notorious crack promoter, especially for cold cracking.
Before you strike an arc, clean your joint thoroughly. Grind off rust and mill scale with a flap disc or grinding wheel. Wire brush away any loose crud. Then, degrease with acetone or a similar solvent, wiping it dry with a clean rag. This is absolutely critical for TIG and aluminum welding, but it makes a massive difference for MIG and Stick too. Don't skip this step – your welds will thank you.
Pick the Right Filler and Gas
Choosing the correct filler metal is fundamental. The filler wire or rod needs to be compatible with your base metal, often slightly less strong or more ductile. For example, for general mild steel, an ER70S-6 MIG wire or a Lincoln Electric 7018 stick electrode is a ductile choice. If you're welding stainless steel, you'll need a specific stainless filler like 308L. Using the wrong filler can lead to incompatible thermal expansion or chemical makeup, which equals cracks.
Your shielding gas is equally important. It protects the molten puddle from atmospheric contamination, particularly oxygen and nitrogen, which can lead to porosity and embrittlement. For MIG, 75% Argon/25% CO2 is standard for mild steel. Ensure your gas cylinder has plenty of pressure and there are no leaks in your lines or torch. A compromised gas shield means a contaminated, crack-prone weld.
Control Your Cooling Rate and Stress
Just like preheating, controlling how your weld cools is vital. Rapid cooling, like dousing a hot weld with water, can induce massive thermal stresses and lead to immediate cracking. Let your welds air cool naturally whenever possible. For really critical or thick sections, you might even consider slow cooling by covering the weld with a welding blanket or burying it in dry sand after welding. This ensures the entire joint cools uniformly and slowly, minimizing internal stresses.
For certain applications, especially on cast iron or heavy sections, a technique called "peening" can help. This involves light hammer blows to the weld bead after it's cooled slightly but is still warm. Peening compresses the weld metal, relieving some tensile stress. However, be careful not to overdo it, as excessive peening can introduce other problems. Focus on even cooling first.
Common Mistakes That Cause Weld Cracks
- Skipping Preheat: Trying to weld thick steel or alloy metals without bringing them up to temperature first. This creates massive thermal gradients and stress.
- Welding Dirty Metal: Laying a bead over rust, paint, oil, or even condensation. These contaminants introduce impurities and hydrogen, making your weld brittle.
- Wrong Filler Metal: Using a general-purpose filler when the base metal requires a specific alloy or a more ductile material. Always match your filler to your base metal.
- Rapid Quenching: Cooling a hot weld too quickly with water, compressed air, or even just leaving it exposed to cold drafts. This shock treatment locks in stress.
- Poor Joint Fit-Up: Leaving excessive gaps or poorly prepared bevels. This forces you to add too much filler metal, increasing shrinkage stress and the likelihood of cracking.
Cracks are frustrating, but they're not a mystery. Understand the science, apply these proven techniques, and you'll be laying down strong, crack-free welds every time. Your projects deserve to last, and with these skills, they will.
Quinn "The Bead Whisperer" Morrissette
Join 30,000+ students learning to weld at home with my online course:
>>> Check out 1 Day Welder here
>>> Shop the 1 Day Welder Amazon Store