Understanding Your Welder's Duty Cycle
Your Welder Just Quit on You Mid-Bead (It's Not Broken).
Ever been in the middle of a killer run, and suddenly your machine cuts out? Lights flash, fan whirs, and you're left staring at a cold gun. You probably just hit the thermal overload because you ignored its "duty cycle."
Understanding duty cycle isn't just about avoiding annoying downtime. It's about protecting your investment, making your welds consistent, and not burning out your machine before its time. Ignore it, and you're basically asking your welder to commit suicide.
What the Hell is Duty Cycle Anyway?
")
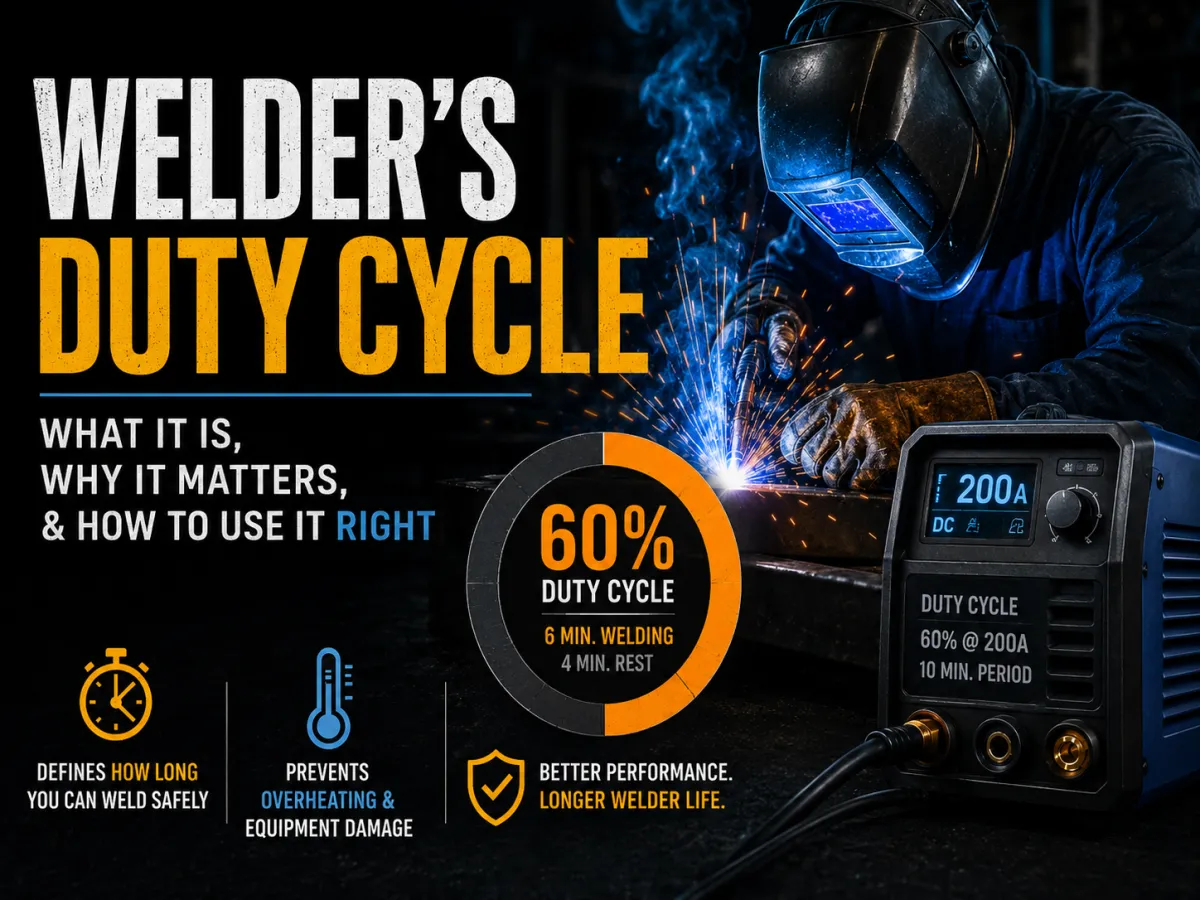
Simply put, duty cycle tells you how long your welder can continuously weld at a given amperage within a 10-minute period before it needs to cool down. It's usually expressed as a percentage.
Think of it like a marathon runner. They can sprint for a bit, but then they need to pace themselves or take a break. Your welder is the same, especially when you're really pushing the amps.
Breaking Down the Numbers
You'll see it on your welder's spec sheet: "60% @ 100A" or "30% @ 200A." This isn't rocket science, but it's crucial. Let's take that "60% @ 100A" example.
It means that at 100 amps, your machine can actively weld for 6 minutes (60% of 10 minutes). The remaining 4 minutes (40%) in that cycle are for cooling. If you crank it up to 200 amps, that might drop to 30%, meaning you only get 3 minutes of welding time before it needs 7 minutes to chill out.
Why It's Not Always 10 Minutes
The 10-minute cycle is a standard for measuring, but it doesn't mean you have to weld for exactly 6 minutes, then stop for 4. It's an intermittent cycle. If you weld for 2 minutes, you've used 20% of your allowance. You then have 4 minutes of welding left at that amperage within that current 10-minute window.
Most home hobby welders aren't laying down continuous beads for 6 minutes straight. You're stopping, repositioning, cleaning, chipping slag. All that "downtime" counts as cooling time for your machine, which is why many beginners rarely hit the thermal overload unless they're really pushing it.
Picking a Welder for Your Needs
If you're just doing light repairs or metal art at home, a machine with a lower duty cycle (like 20-30% at medium amps) is usually fine. Your typical Hobart Handler 140 or a small Lincoln Electric 140 MP will handle most garage projects without breaking a sweat.
But if you're building heavy-duty trailers, doing thick plate work, or planning to run continuous beads for production, you need a machine with a higher duty cycle at higher amperages. Think big Miller Multimatics or industrial-grade stick welders that can run 60-100% duty cycle at 250+ amps.
Pushing It Too Hard: What Happens?
When you exceed your welder's duty cycle, the internal components heat up. To prevent damage, a thermal overload switch kicks in and shuts down the welding output. The fan usually keeps running to cool things down.
You'll often see a small amber light on your welder indicating the thermal overload. Don't panic. Just let it cool down. Trying to force it to weld before that light goes out is a surefire way to shorten your machine's life or fry its electronics. Walk away, grab a drink, come back when it's ready.
Common Mistakes Beginners Make
Ignoring the Spec Sheet: Buying a welder based purely on peak amperage without checking its duty cycle at practical settings.
Continuous Welding Without Breaks: Trying to lay down long, unbroken welds on thick material with a low-duty-cycle machine.
Thinking Higher Amps = More Weld Time: It's the opposite! The higher the amperage, the less time you get to weld.
Not Letting it Cool: Restarting immediately after a thermal overload, or not letting the fan do its job.
Buying Undersized: Getting a cheap machine for heavy fabrication because the price was right, then wondering why it always quits.
Don't be that guy whose welder is always on strike. Understand its limits, give it a break when it needs one, and it'll serve you well for years. Weld smarter, not just harder.
Happy welding, and don't let your machine take too many smoke breaks!
Quinn "The Welder Whisperer" Morrissette
Join 30,000+ students learning to weld at home with my online course:
>>> Check out 1 Day Welder here
>>> Shop the 1 Day Welder Amazon Store