Master the 4 Essential Types of Welding Joints
You can have the best welder money can buy, but if you don't know how to join two pieces of metal, you're just making fancy scrap. Forget exotic passes and wild projects for a minute. Your entire welding journey starts and ends with mastering the fundamental joint types.
These aren't just names in a textbook. These are the foundations of every single thing you'll ever build. Whether you're building a workbench or a custom bumper, if you can't nail a solid butt joint or a clean lap joint, your project is doomed before the paint dries. Get these right, and you'll build strong, reliable stuff every time.
Butt Joint: The Straightforward Strength
The butt joint is exactly what it sounds like: two pieces of metal butted up against each other, edge-to-edge. This is your most basic joint, but don't underestimate it. Beginners often struggle with penetration or blowing through.
For thinner material (1/8" or less), you'll typically butt them tight together. For thicker stuff, a small gap – maybe 1/16" – can help ensure full penetration. Your goal is to melt both edges equally and fill that seam with a consistent bead. For MIG, I often drop my wire speed slightly from my usual settings to prevent excessive buildup.
Lap Joint: Overlapping Security
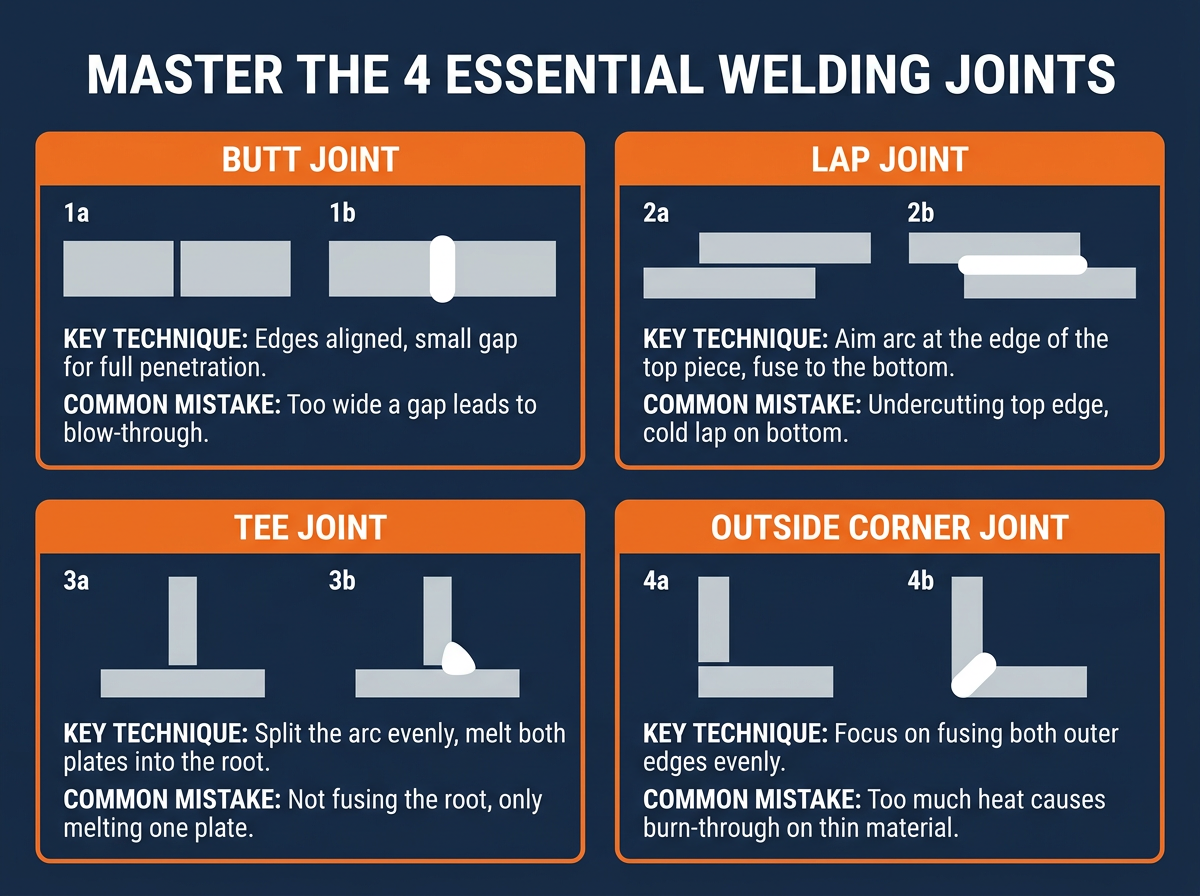
A lap joint is when one piece of metal overlaps another, like shingles on a roof. This is a common joint for general fabrication and adds a lot of structural integrity without complex fit-up. You're essentially welding along the edge of the top piece to the surface of the bottom piece.
The trick here is to focus your arc primarily on the edge of the top plate, letting the heat wash down onto the bottom plate. If you spend too much time on the bottom, you'll get a cold lap. Too much on the top, and you'll undercut the edge. Try a slight push angle for MIG or a drag for stick, keeping that arc on the leading edge of the top piece.
Tee Joint: The Cornerstone of Structure
The tee joint looks like a capital "T" – one piece standing perpendicular to another. This is a super common joint in frames, brackets, and structural work. It's a fillet weld, meaning you're filling the inside corner.
Your main challenge is ensuring you melt the root of that corner and get good fusion on both plates. Split your arc right down the middle, aiming to melt the edge of the vertical piece and the flat surface of the horizontal piece equally. Don't just focus on the flat plate; you'll get a cold, weak weld on the vertical. Sometimes, a slight increase in amperage or wire speed compared to a butt joint on the same thickness helps overcome the heat sink of two pieces.
Outside Corner Joint: Clean Edges, Strong Welds
This joint brings two pieces together at a 90-degree angle on their outside edges, forming an external corner. It's often used where you want a clean, flush finish, like on boxes or enclosures. This one can be tricky, especially with thin material, because you're welding on a sharp edge.
You need less heat here than you might think, especially if you're working with thinner gauge stuff like 16-gauge or 14-gauge. Too much heat and you'll blow right through the edge, leaving a nasty crater. Focus on a tight, fast bead, fusing just the very edges together. A small, consistent puddle is key. Think precision, not brute force.
Common Mistakes Beginners Make with Joints
- Ignoring Fit-Up: If your pieces don't fit together well, no amount of welding skill will save it. Gaps, misalignments, and dirty metal are your enemies.
- Wrong Heat Settings for the Joint: A tee joint often needs more heat than a butt joint on the same material thickness due to increased heat sink. Adjust your voltage and wire speed accordingly.
- Trying to Bridge Huge Gaps: Welds aren't meant to fill cavernous gaps. If your fit-up is poor, fix it before you strike an arc. Otherwise, you'll get weak, ugly welds.
- Inconsistent Travel Speed: This leads to uneven penetration and bead profile. Practice maintaining a steady pace, letting the puddle do the work.
- Not Fusing Both Sides of the Joint: Especially critical in tee joints. Make sure you're melting both pieces of metal into the puddle, not just one.
Mastering these four basic joints will give you the confidence to tackle almost any project. It's not about being fancy; it's about being fundamentally sound. Practice them until they're second nature, and you'll be building solid, functional stuff in no time.
Quinn "The Arc Guy" Morrissette
Join 30,000+ students learning to weld at home with my online course:
>>> Check out 1 Day Welder here
>>> Shop the 1 Day Welder Amazon Store