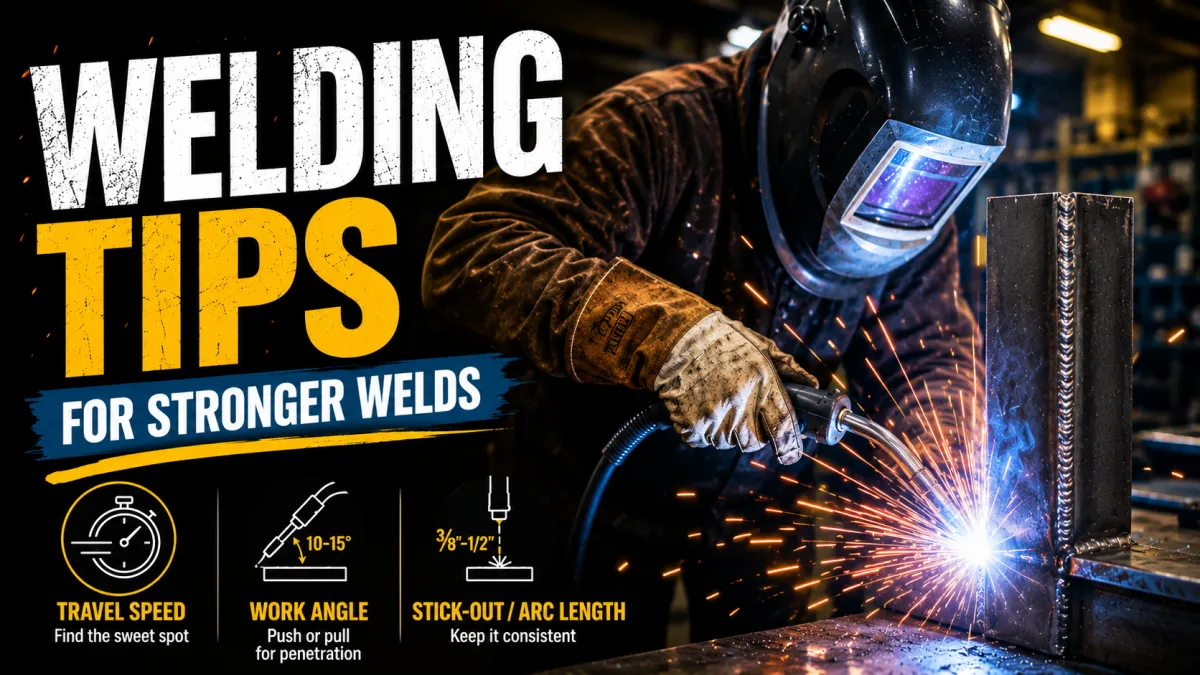
How to Master Travel Speed, Work Angle, and Stick-Out
Forget fancy machine settings for a second. Your travel speed, work angle, and stick-out are the three core variables you control with every single arc. Master these, and you’ll transform ugly, weak welds into clean, strong beads that’ll make you proud. These aren't just details; they're the difference between a project that holds and one that crumbles.
The Go-Kart Effect: Master Your Travel Speed
Imagine you’re driving a go-kart on a track. Too slow, and you’ll pile up paint, making your bead fat, tall, and likely lumpy. You’re dumping too much heat into one spot, increasing warpage and potentially blowing through thin material.
Too fast, and you’ll stretch the puddle thin, creating a narrow, ropey bead with poor penetration and likely undercut. The weld won't fuse properly to the base metal, making it weak. Think of it like trying to paint a wall too quickly – you miss spots.
The sweet spot means your puddle is just big enough to wet out nicely, laying down a consistent, even bead that feathers into the base metal. You'll hear a consistent sizzle for MIG or a steady crackle for stick. Watch the molten puddle behind the arc; it should be about 1.5 to 2 times the width of your electrode. If you're running a Hobart Handler 140, try speeding up if your bead looks like a blob, or slowing down if it's super thin.
Angle of Attack: Dialing In Your Work Angle

Your work angle is how you aim that arc at the joint. Generally, for flat and horizontal welds, you'll either push or pull the puddle.
Pushing (forehand) the puddle means your gun/torch is angled 5-15 degrees ahead of the direction of travel. This typically gives you a wider, flatter bead with less penetration, often preferred for thin sheet metal or cap passes where cosmetics matter more. It tends to flatten out the bead.
Pulling (backhand) the puddle means your gun/torch is angled 5-15 degrees behind the direction of travel. This digs in more, giving you deeper penetration and a narrower, crowned bead. It’s excellent for thicker materials, root passes, and when you need maximum strength. Most beginners start pulling with MIG for better penetration.
For TIG, a slight backhand angle (around 10-15 degrees) is common for good puddle control. Stick welding also generally uses a slight pull angle, depending on the rod (e.g., 6010 for deep penetration often uses a drag angle). Experiment with a piece of scrap; try a 90-degree angle, then push 10 degrees, then pull 10 degrees. You'll see the difference instantly.
Keep Your Distance: The Power of Stick-Out (MIG) & Arc Length (TIG/Stick)
This one is critical and often overlooked.
MIG Welding: Stick-Out. This is the length of wire extending from the contact tip to the arc. Too short (less than 1/4 inch), and you risk burning back into your tip, causing issues. Too long (more than 1/2-3/4 inch), and you'll lose current, get a weaker arc, more spatter, and poor penetration. Your wire speed will feel off, and the arc might become unstable. Think about it: the wire has further to travel, losing electrical resistance. Keep your stick-out consistent, usually around 3/8 to 1/2 inch for most applications. A consistent stick-out means consistent heat and consistent penetration.
TIG & Stick Welding: Arc Length. This is the distance between your electrode (tungsten or rod) and the workpiece.
For TIG, a short arc length (about 1/16 to 1/8 inch) is key. Too long, and your arc gets wide and wild, losing heat concentration, causing porosity, and making it hard to control the puddle. Too short, and you risk dipping your tungsten, contaminating the puddle, and having to regrind.
For Stick, maintaining a short arc length (roughly the diameter of your electrode) is crucial for a stable arc and good penetration. Too long, and your arc gets unstable, spattery, and loses penetration. Too short, and the rod sticks. Listen to the arc – a short arc has a crisp crackle; a long arc sounds like a frying pan.
Common Mistakes
Don't just randomly adjust your welder; focus on these fundamental errors first.
Inconsistent Travel Speed: The most common culprit for ugly, inconsistent beads. Slow down for a moment, speed up the next. This leads to fat spots, thin spots, and uneven heat input across your weld.
Wrong Angle for the Joint: Trying to push a root pass on thick material is asking for trouble. Pulling too much on thin sheet can lead to blow-through. Understand what each angle does.
Variable Stick-Out/Arc Length: This causes inconsistent current and heat. One moment you're getting good penetration, the next you're just laying wire on top of the metal or getting a weak, spluttery arc. Keep that distance steady!
Ignoring the Puddle: Many beginners focus only on the arc. The puddle is your guide. Watch its size, how it wets out, and how it solidifies behind the arc. It tells you everything about your travel speed and heat.
Not Practicing on Scraps: You wouldn't learn to drive a car by only watching videos. Grab some scrap metal, make a pass, analyze it, adjust one variable (speed, angle, or distance), and make another pass. Repeat until it's second nature.
These three elements – travel speed, work angle, and stick-out/arc length – are your personal welding superpower. They take conscious practice, but once they click, your welds will transform. Get out there, burn some rod, and make those beads sing!
Quinn "The Puddle Master" Morrissette
Join 30,000+ students learning to weld at home with my online course:
>>> Check out 1 Day Welder here
>>> Shop the 1 Day Welder Amazon Store