What Your Weld Bead Is Telling You: Diagnose and Fix Common Weld Problems
Welding isn't just about pretty beads; it's about structural integrity and confidence.Her's what to look out for.
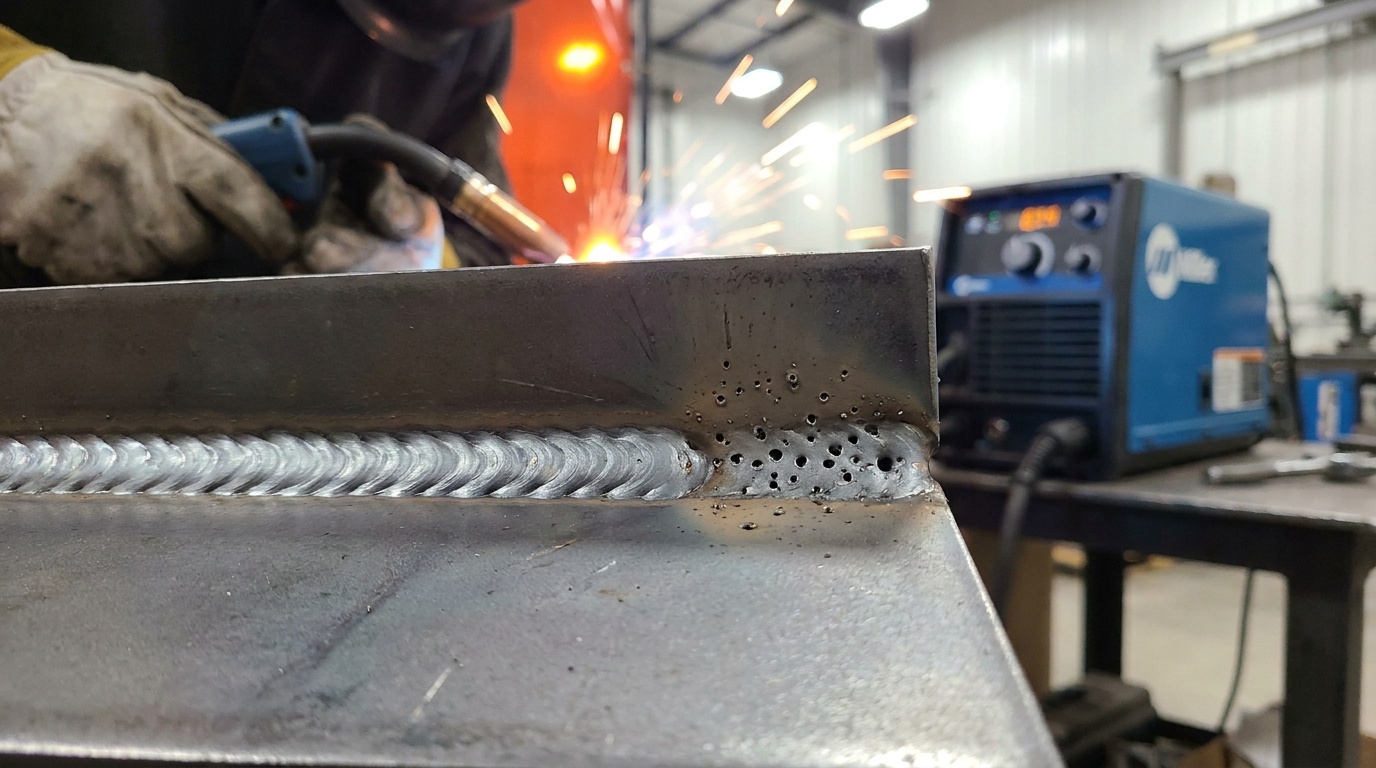
Porosity: The Swiss Cheese Look
What it looks like: Small holes or tunnels on the surface or inside the weld. Think Swiss cheese or a sponge.
What it's telling you: Usually, gas shield failure or dirty metal. For MIG and TIG, your gas flow might be too low, too high, or you're welding in a draft. For stick or flux core, it could be damp rods or dirty base metal.
How to fix it: Check your gas tank — is it empty? — and your flow rate. Try 20-25 CFH for MIG. Is your nozzle or cup clogged? Clean your metal with a grinder or wire brush; rust, paint, oil, or even moisture will mess up your shield. Keep stick welding rods dry.
Undercut: The Valley of Weakness

What it looks like: A groove or notch melted into the base metal right along the edge of the weld bead. The bead itself sits on top, but the parent metal next to it is eaten away.
What it's telling you: Too much heat, too fast travel speed, or incorrect torch angle. The arc is digging into the base metal, but the filler metal isn't filling the groove fast enough.
How to fix it: Slow your travel speed down. Adjust your heat — a bit less voltage for MIG, or amperage for TIG/stick. Change your torch angle slightly; try a small upward angle instead of strictly straight or downward. Push your weld puddle into the joint, don't just drag it on top.
Lack of Fusion / Cold Lap: Stuck On Top
What it looks like: The weld metal simply sits on top of the base metal, or one side of the weld isn't properly melted into the joint. There's no smooth transition; it often looks like a seam where the weld just ends.
What it's telling you: Not enough heat or too fast travel speed. The base metal didn't get hot enough to truly melt and fuse with the filler metal. It could also be a bad torch angle, not aiming into the joint's root.
How to fix it: Crank up your heat — increase voltage for MIG, amperage for TIG/stick. Slow your travel speed, letting the puddle really wet out and fuse. Ensure your torch angle directs the arc into the joint's root, melting both sides evenly. A slight weave helps get both edges.
Burn-Through: The Hole in Your Project
What it looks like: Actual holes blown right through your base metal. This usually happens on thin material, like 16-gauge sheet metal.
What it's telling you: Way too much heat for the material thickness, or you're holding the arc in one spot too long. Your material is overheating and just disintegrating.
How to fix it: Reduce your heat (voltage/amperage). Increase travel speed; move faster across the joint. If you're welding thin sheet metal, try pulsing the trigger (for MIG) or using a "stitch" weld technique — short bursts of welding followed by brief pauses to let the metal cool slightly. Even a small Hobart Handler 140 can blow through thin stuff if you're not careful with settings.
Excessive Convexity / Concavity: Too Much or Not Enough Metal
What it looks like:
Convex: A very high, rounded bead, like a worm sitting on the surface. It's not flat or slightly crowned.
Concave: A sunken-in bead, like a ditch or a valley.
What it's telling you:
Convex: Usually too little heat, too much wire speed (MIG), or too slow travel speed, just piling up metal. The puddle isn't spreading out and wetting into the base metal.
Concave: Too much heat, too fast travel speed, or not enough filler metal. The puddle is too fluid and shrinks too much when it cools.
How to fix it:
Convex: Increase heat (voltage for MIG, amperage for TIG/stick), or slightly reduce wire feed speed (MIG). Speed up your travel just a touch to flatten the bead.
Concave: Reduce heat, increase wire feed speed (MIG), or slow travel speed to allow more filler metal to deposit. If TIG welding, add more filler rod.
Common Mistakes Beginners Make
Ignoring the sound of the arc: A good MIG arc sounds like sizzling bacon. A bad one sounds like popcorn or a steady hiss. Listen to it!
Not cleaning your metal: Rust, paint, oil, mill scale — it all contaminates your weld, causing porosity and lack of fusion. Grind it clean with a flap disc.
Rushing the weld: Trying to go too fast. Slow down, control the puddle. Speed comes with practice, not impatience.
Wrong machine settings for thickness: Don't try to weld 1/8" mild steel with settings meant for 1/4". Consult your welder's door chart or a reliable app.
Inconsistent travel speed and angle: Jerky movements lead to inconsistent beads and defects. Practice smooth, steady movements until they become second nature.
Welding is a skill, and like any skill, it takes practice and observation. Don't get discouraged by a bad bead. Every ugly weld is a lesson learned. Adjust one variable at a time, pay attention to the feedback, and you'll be laying down stack-of-dimes welds in no time.
Quinn "The Bead Boss" Morrissette
Join 30,000+ students learning to weld at home with my online course:
>>> Check out 1 Day Welder here
>>> Shop the 1 Day Welder Amazon Store